


Most amigurumi at a craft fair is round and friendly. Then there is the shelf with the dragons on it.
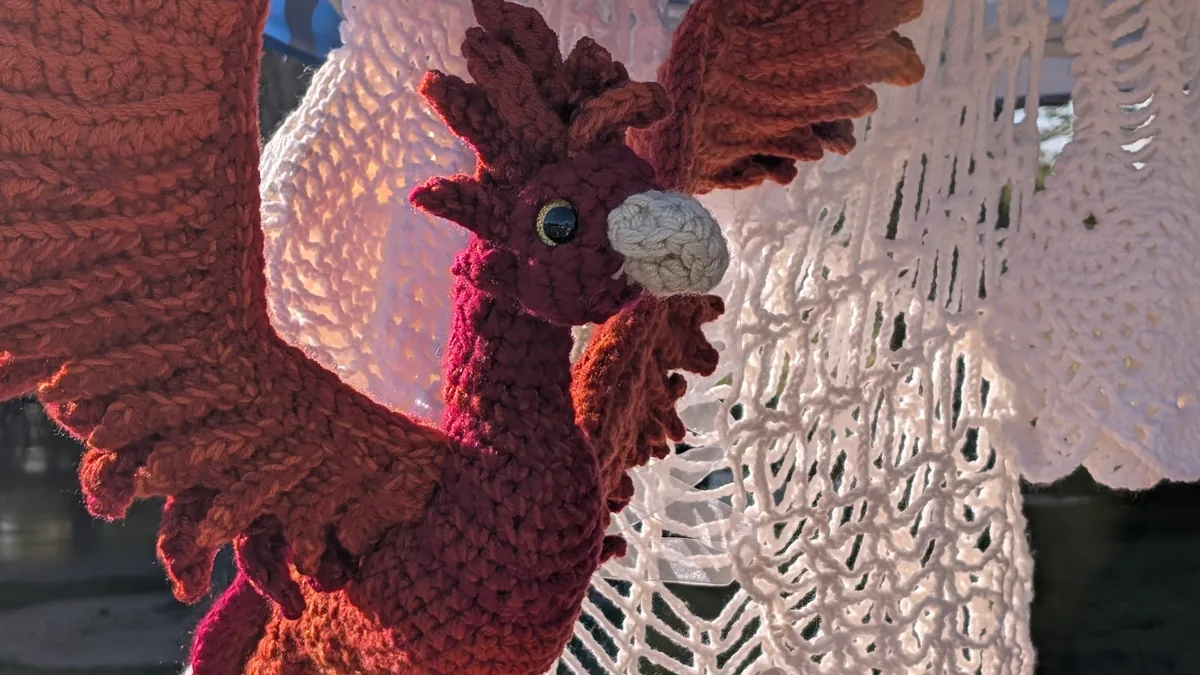
This phoenix was hanging at eye level in a booth, wings out, catching low afternoon sun through the tent. It is a good teaching piece, because almost everything that makes it work is a decision you could copy on a much simpler project.
The colour is doing the heavy lifting
Look at the body and you will see it is not one red. It runs from a dark wine at the head through rust and brick down into a hot pink at the tail and the leg, and the wings pick up a lighter orange at the tips.
There are three ways crafters get that effect, and they are not equally forgiving.
-
A gradient or “cake” yarn that changes colour on its own as you work. Easiest by a mile, and the colour shift follows your stitch count, which means it lands in a slightly different place on every piece you make.
-
Stranding several colours and swapping one at a time. More control, more ends to weave in.
-
Working blocks of solid colour and changing at the round. The most control, the most visible transitions – which you can hide by changing colour on the far side of the piece, where the seam will sit.
For a first attempt, a gradient yarn on the body with solid contrast on the beak, wings and crest gets you most of the effect for a fraction of the fuss.
Wings that stay open
The wings are the part people underestimate. A crocheted wing left to itself flops, and a flopping wing reads as a mistake rather than a bird.
Three fixes, in increasing order of effort:
-
Work them at a tight gauge. Go down a hook size or two from what the yarn band suggests. Dense fabric holds a shape on its own, and it is the same trick that keeps stuffing from showing through on any amigurumi.
-
Run floral wire or pipe cleaner through the edge. Crochet around it or thread it through the last round, and fold the ends back on themselves so nothing sharp can work its way out. This is what lets a wing be posed rather than just stiff – but it is also why a wired piece is not a baby toy.
-
Block them. Wet the finished wing, pin it flat to the shape you want, and let it dry completely. On acrylic you can go further and steam it, holding the iron above the fabric and never on it, which relaxes the fibre into the new shape semi-permanently. Practise on a swatch first, because too much heat will flatten the stitch definition and you cannot undo it.
The feather edges here are made as separate pointed pieces and worked in, which is more sewing but gives a much better silhouette than trying to shape them in one pass.
The face is three decisions
Fantasy creatures live or die on the head, and there is less going on here than it looks.
The eye is a large domed safety eye with a gold ring, set deep into the head and slightly forward. Placement matters more than the eye itself: too far apart and you get a fish, too close and you get something unsettling. Pin them in place and walk away for a minute before you commit – with safety eyes, once the washer is on, it is on.
The beak is a pale, dense cone worked in a much tighter gauge than the head, which is what keeps it crisp against the fuzzy body. Note that it is a different colour family entirely – cream against deep red – and that contrast is what makes the face legible from across a room.
The crest is a row of individual pointed spikes sewn along the back of the skull, not a single worked-on piece. Making them separately means you can lay them out, get the spacing right, and change your mind.
If you have not sewn small pieces onto a curved surface before, start with a simpler pattern and get comfortable with invisible seaming first. It is the skill that separates a tidy finished toy from a lumpy one.
What yarn is best for a crocheted dragon or phoenix?
A smooth worsted or aran acrylic is the usual choice. It shows stitch definition clearly, it is cheap enough that a large project does not hurt, and it takes steam blocking well, which matters if you want wings to hold a shape. Save the fuzzy chenille yarns for round, squishy animals – on a detailed creature the fluff hides exactly the stitch definition you are working hard to create.
How do you stop crocheted wings from flopping?
Work them at a tighter gauge than the yarn band suggests, then either block them into shape or run floral wire around the edge before you close the final round. Wire gives you a poseable wing; blocking gives you a fixed one. Anything destined for a small child should be blocked rather than wired.
Is a fantasy amigurumi a beginner project?
The stitches are beginner stitches – it is nearly all single crochet worked in the round, with increases and decreases. What makes it advanced is the assembly: many separate pieces, sewn onto curved surfaces, where placement decides whether it looks right. If you can make a ball and a tube and join them neatly, you can make this. It will just take longer than you think.
Can I sell amigurumi I made from someone else's pattern?
It depends entirely on the designer. Many independent pattern writers explicitly allow selling finished items, often asking for credit; others do not. The permission is usually stated in the pattern itself, so check there first and ask if it is silent. Selling the pattern file itself is never okay.
The short version
Let a gradient yarn do the colour work, go down a hook size so the fabric holds itself up, make the crest and feather tips as separate pieces so you can place them properly, and pin the eyes before you set them.
If you are heading to a fair with a shelf of these, our craft fair display tips cover the other half of the job. And for the opposite approach – soft, round and squishy rather than sharp and detailed – see chenille plush toys.


